
The dry mount press in the CommLab is an easy way to neatly mount your artwork on matte board without messy tape, drippy glue, or curling paper. Just follow these steps to create perfectly mounted artwork.
Tools and Materials
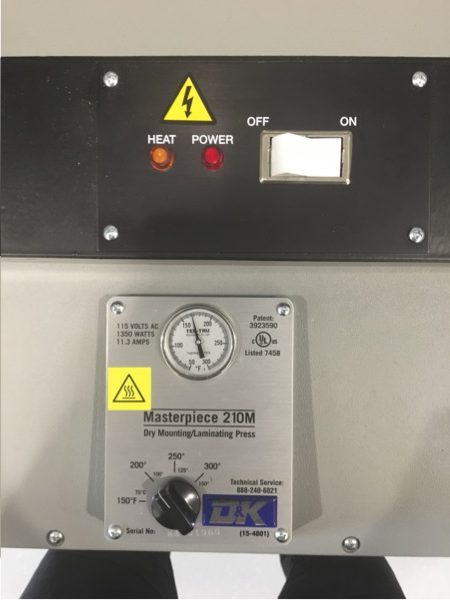
Dry mount press: Before you begin, make sure the press is turned on, as it takes 20 minutes to heat up. The on switch is located on the top next to the indicator lights. The temperature for permanent adhesion is 200F.
Release paper pocket: You will need a release paper pocket to prevent your project from sticking to the inside of the dry mount press. These are located in the drawer underneath the dry mount press.
Dry mount tissue: Ask the Lab Agent for the right size dry mount tissue for your artwork. The CommLab has pre-cut tissue sheets in a number of sizes, but we can cut custom sizes too.
Steps
- Open your release paper pocket and place your artwork inside face down. Lay the dry mount tissue over top, making sure to cover the entire artwork, as any paper left uncovered will not stick to the matte board. Close the release paper pocket, taking care not to move the layers around. Use the tacking iron to tack down a corner of the dry mount tissue to keep it from moving around when you place it inside the dry mount press.
- Place the release paper pocket inside the dry mount. Close the lid, pushing firmly to make sure it is down all the way. Leave the pocket in the dry mount press for about 35 seconds, then remove the pocket and let it cool for 20-30 seconds.
- Trim the excess tissue from the edges of your artwork – once you mount the artwork, you will not be able to remove it. Then, place your matte board inside the release paper pocket. Line up your artwork on top of the matte board with the tissue side facing down, then carefully close the release paper pocket. Use the tacking iron to tack down a corner of the artwork so the layers do not move around. Then, place the entire folder back into the dry mount press, and set the timer on top for 2 minutes. When it’s done, remove the pocket and place the metal weights on top while it cools, about 5 minutes.