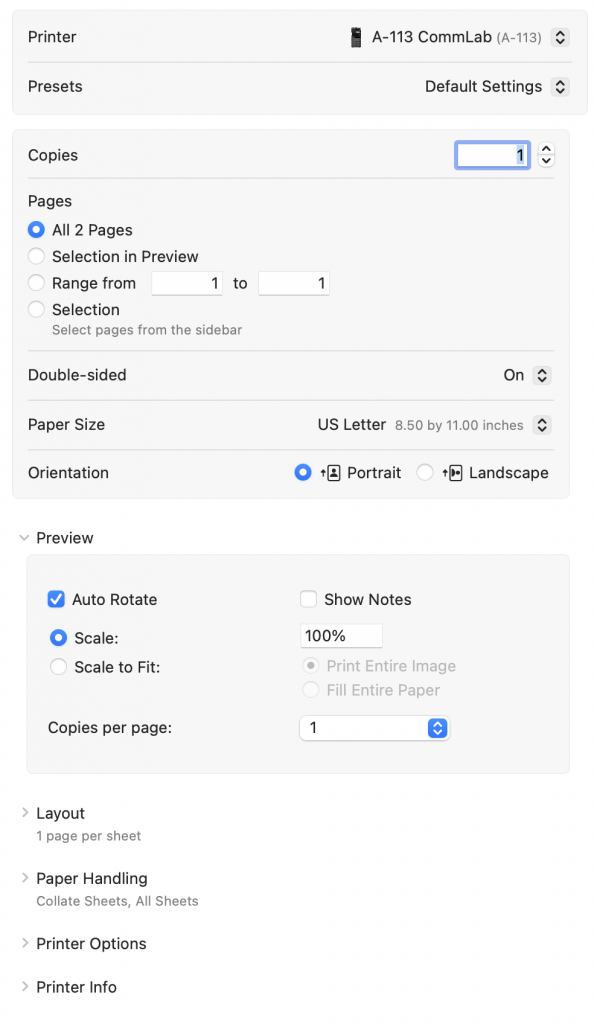
Print settings have changed slightly since the installation of the new computers. The instructions below will walk you through how to turn off double-sided printing and how to change setting to print from the bypass tray.
Turning Off Double-Sided Printing
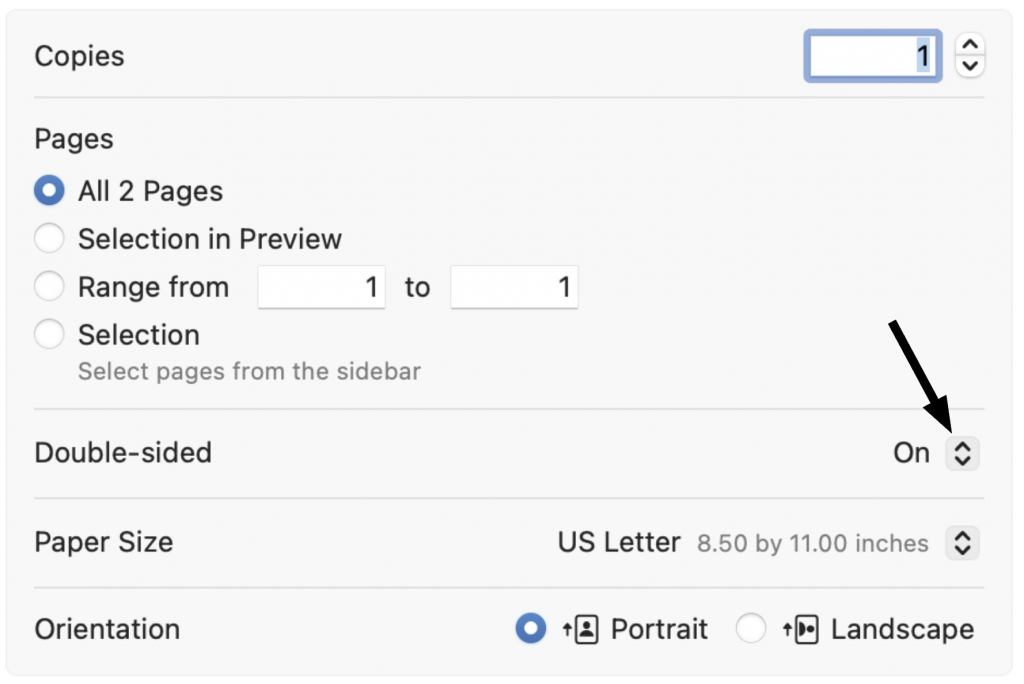
To turn off double-sided printing go to the Copies box, located at the top of the print screen.
On the right side of the Double-sided option click on the symbol with two arrowheads.
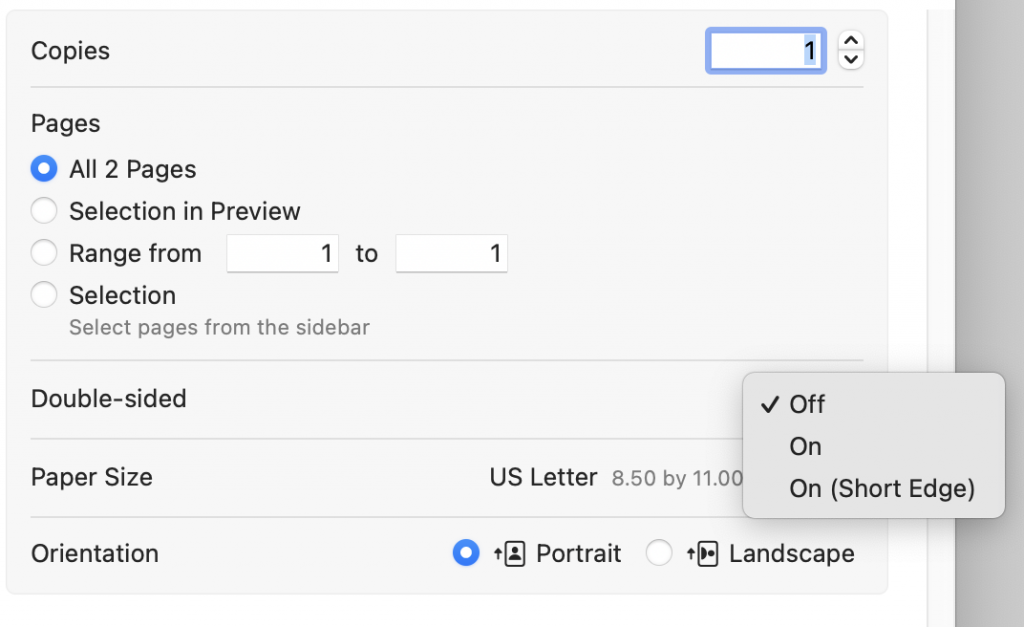
A drop down menu will appear. Select Off.
Printing from the Bypass Tray
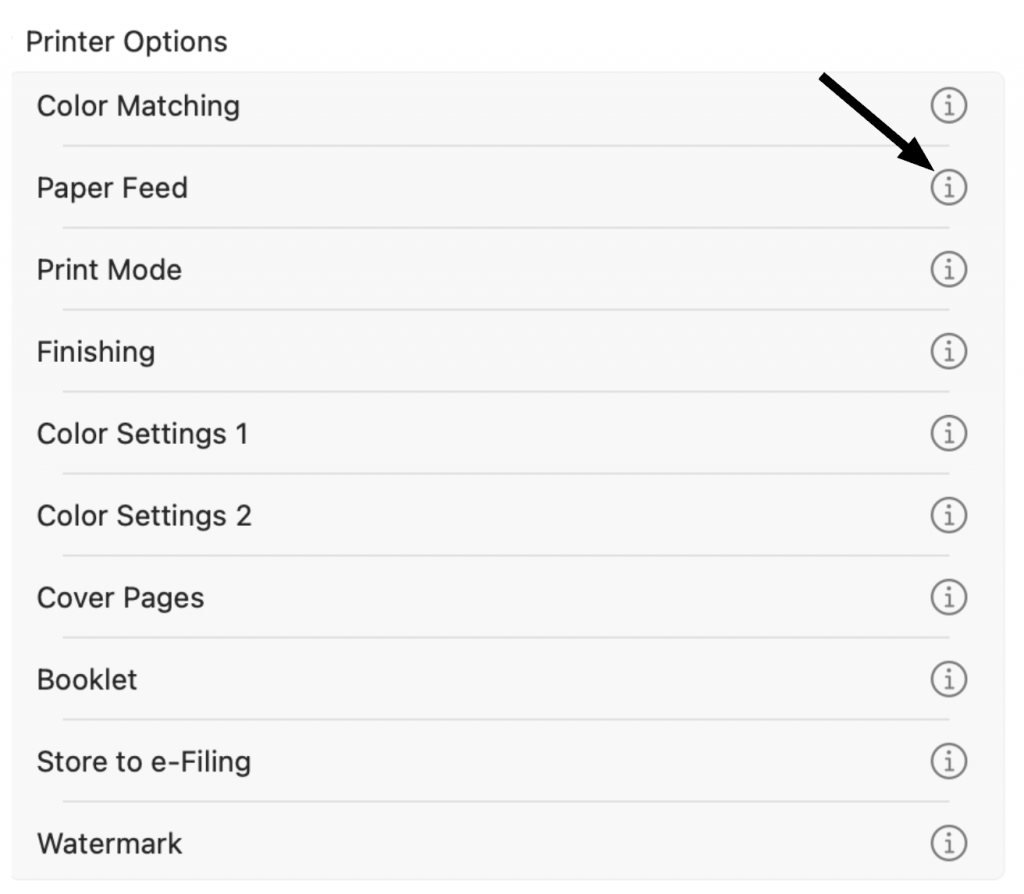
To print from the bypass tray expand the Printer Options menu item. Go to Paper Feed and click the information icon on the right hand side. A pop up box should appear.
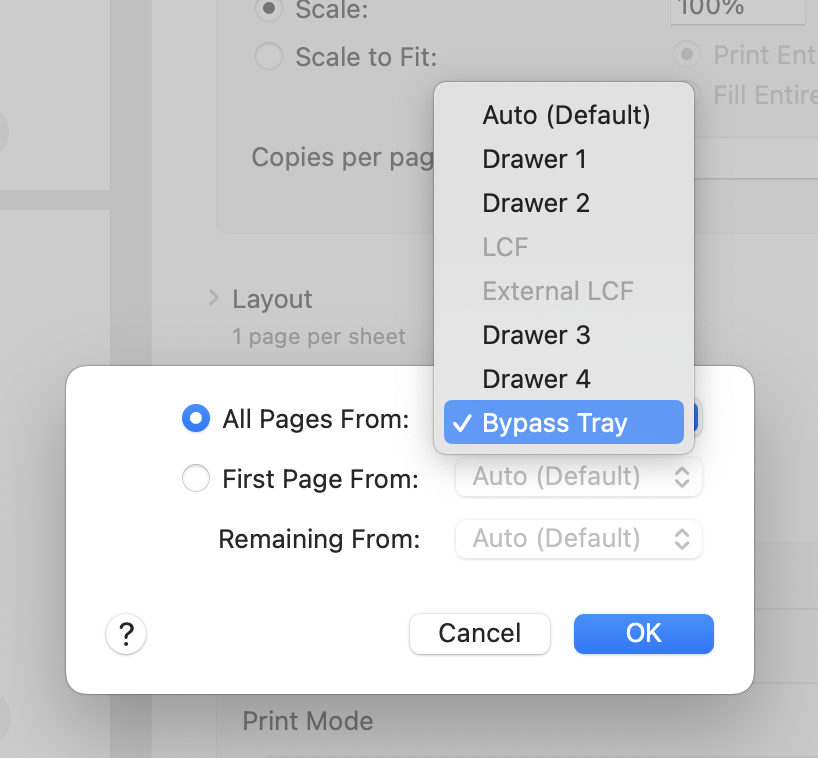
Click on the drop down menu and select Bypass Tray and select OK. Now when you go to print the document the printer will pull paper from the bypass tray.
Printing a color image in black and white can make it look washed out or flat on paper. Instead, use these methods to make your image black and white in Photoshop and have more control over how the final image looks!
Method #1: Use a Black and White Adjustment Layer
This method is non-destructive, meaning the layer simply covers the colors instead of removing them from the image permanently.
Make a black and white adjustment layer. From the Layers Panel, click on the New Adjustment Layer icon (half black/white circle) and select Black & White.
2. Adjust the color sliders. In the Properties Panel, there are six sliders: Reds, Yellows, Greens, Cyans, Blues, and Magentas. These sliders control the brightness of the greyscale version of each color. For example, moving the Reds slider to the right will lighten the pixels that were originally red. This can be used to create contrast and depth in the image.
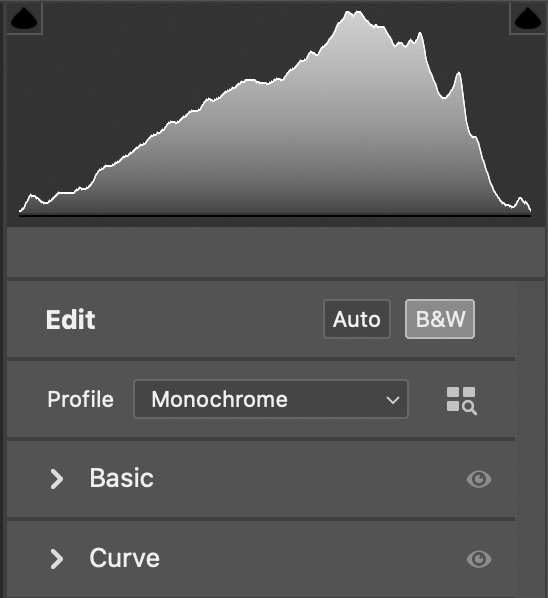
Method #2: Convert Image with the Camera Raw Filter
This method is destructive, meaning that the image will be permanently changed to black and white once applied.
Apply the Camera Raw Filter. Go into Filter and select Camera Raw Filter.
2. Convert image to black and white. Either click on the B&W button or select Monochrome from the Profile drop-down menu.
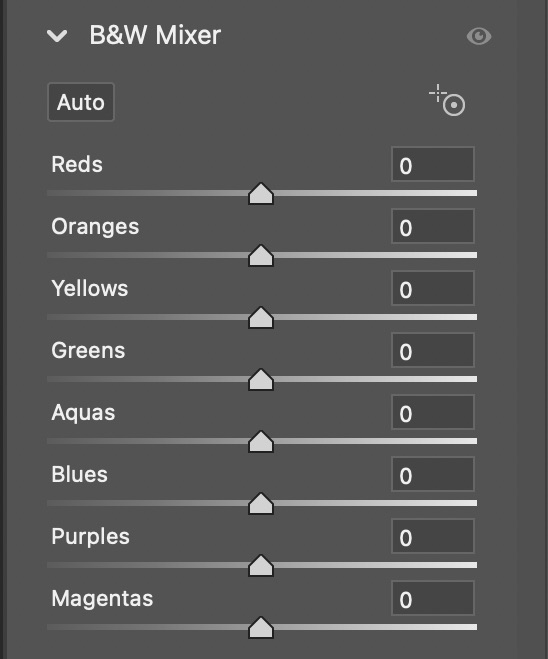
3. Adjustthe color sliders. Under B&W Mixer, there are eight sliders: Reds, Oranges, Yellows, Greens, Aquas, Blues, Purples, and Magentas. These sliders control the brightness of the greyscale version of each color. For example, moving the Reds slider to the right will lighten the pixels that were originally red. Because of the two additional sliders, you have more control over the image compared to using a black and white layer.
Do you have an raster image that you want to change into a vector object in Illustrator? This Tiktok explains how to use live trace to convert an image into a vector graphic faster than manually tracing it.
Want to add more spice to your objects in InDesign? Try out the effects panel! This video goes over each of the various effects in InDesign and how to apply the same effect to multiple objects.
When creating content often times it’s helpful to use photos and videos. However, many of the quality photos online are copyrighted – i.e. it’s illegal for you to use them without permission!
In order to avoid legal trouble, check out these resources for open-domain photos you can use for all of your creative projects.
Flickr: great community-sourced photos, search by name, photographer, or subject
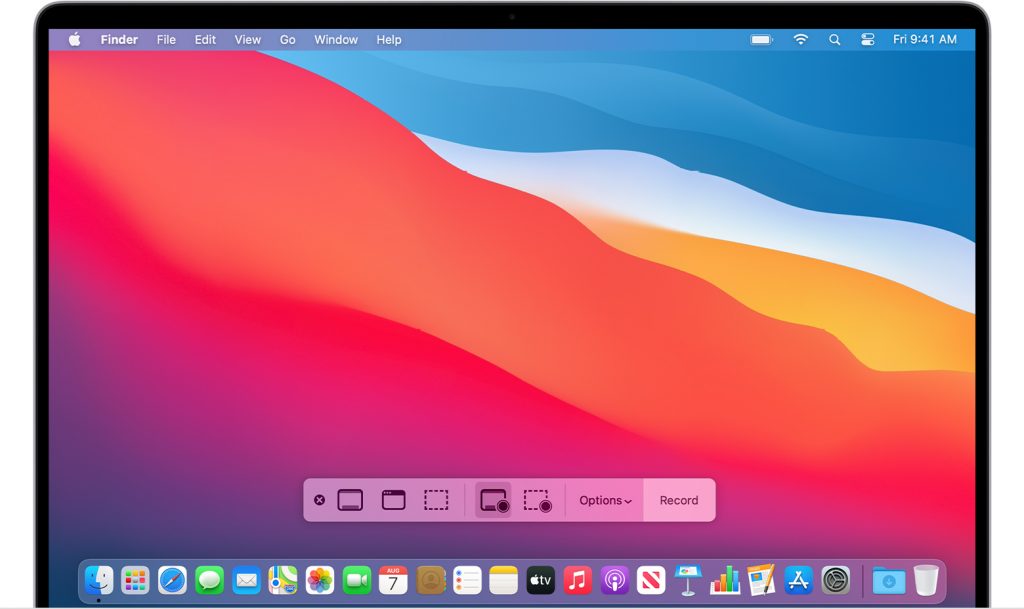
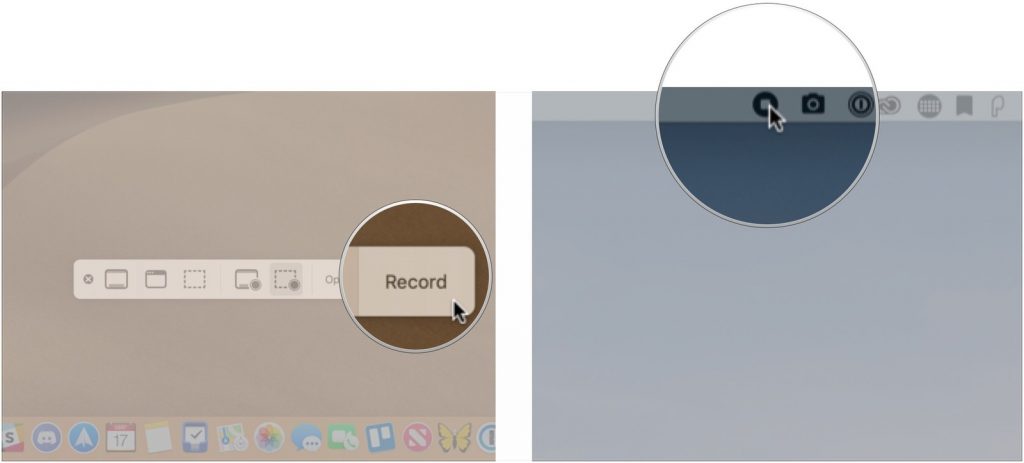
Follow these simple steps to screen record on your MacBook.
Press and hold down the Shift, Command, and 5 buttons at the same time
2. The screen recording bar will pop up on the bottom of your screen with 5 options to choose from (left to right)
Capture entire screen
Capture selected window
Capture selected portion
Record entire screen
Record selected portion
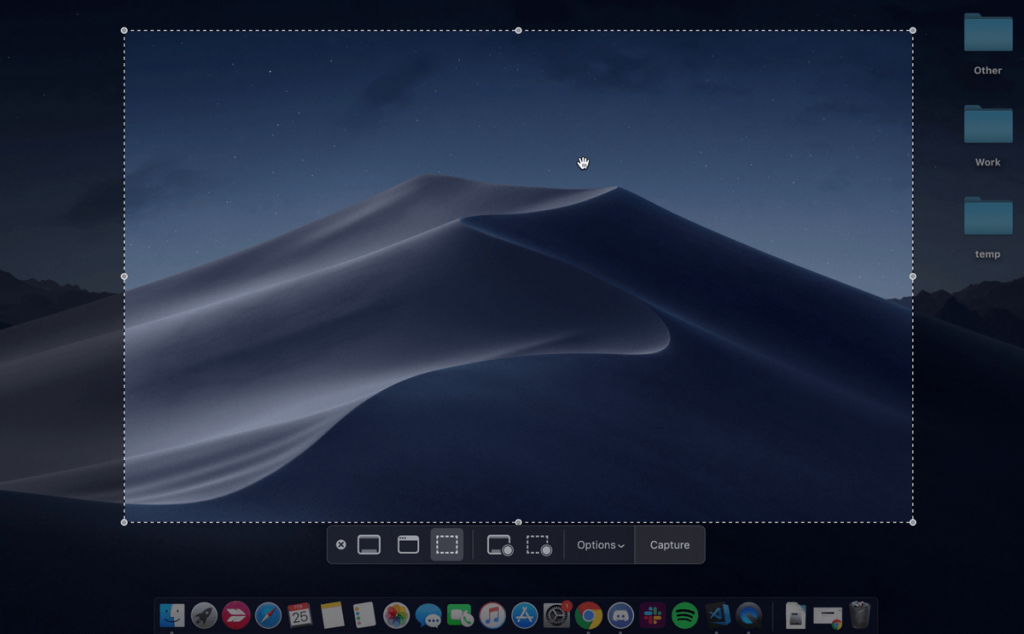
3. Taking a photo
To take a screen grab, simply click your mouse pad. You can adjust the size of the screen grab by clicking on capture selected portion before taking the photo.
4. To take a screen recording
Simply hit the record button. Your laptop will automatically start recording your screen.
5. To stop recording
Press the stop button on the info bar at the top of your screen.
The screen grabs and recordings will appear on your desktop after you’re done.
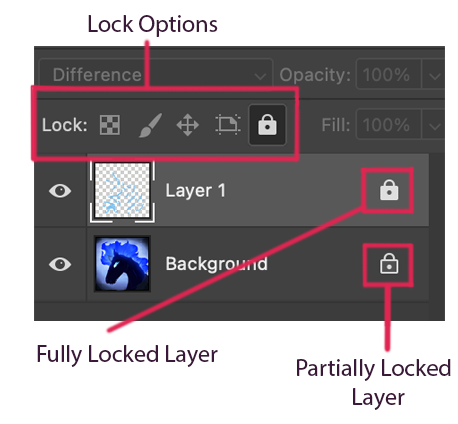
All the adobe applications have a lovely feature called the layer lock. Layer locks are used to prevent working on the wrong layer. It’s frustratingly easy to work on layer thinking it’s a different one entirely. Fully locking layers or partially locking layers prevents you from making changes to the layers that are already completed.
From left to right in the Lock Options: Lock Transparent Pixels, Lock Image Pixels, Lock Position, Lock All, and Full Lock.
Fully locking your layer locks all four of the lock options available as well as preventing you from making selections. These are “Lock Transparent Pixels”, “Lock Image Pixels”, “Lock Position”, and “Lock All”.
The Lock Transparent Pixels does what the title suggests and prevents the user from changing any of the transparent pixels on your layer. A shortcut for this is the forward slash key (/).
The Lock Image Pixels prevents the user from painting or editing any of the layer. You can still move, transform, or select items on your layer.
The Lock Position prevents the user from moving or transforming anything on the layer, however it allows anything else.
The Lock All option prevents everything except making selections on the layer.
To apply a lock option to a layer of your choice, you must first make sure you’re on the layer. Select the layer you want to lock and click one or more of the lock options. If you select the Full Lock option (far right), the other four options will turn grey because they are unnecessary with the Full Lock option selected.
Powtoon is an amazing website the offers free templates for animated videos.
Edit in-website, add your own text, and export your videos with help from easy-to-follow instructions as you go. Whether you’re creating a news briefing, an educational video, or anything else these templates are easy to use and customize.
Here’s a tutorial on how to edit a video template: