Royalty-free—what it is and is not

(Plus a list of RF stock sites!)

We’ve all been there—you’re working on a project and need some stock media. You know you can’t use just anything off of the internet because of copyright law. But even when you go to sites that offer stock media, it can be confusing understanding what you can use and how.

Royalty-free does not always equal fee-free.

While we might think that royalty free (rf) media is free to use. This is not always the case. The term simply means that you do not have to pay the creator royalties. Think how authors get paid for every copy of a book sold, or how a musician gets paid for every stream on Spotify. Those payments based on the number of times a work is used are royalties. You can check out this post by Amos Struck for a more comprehensive explanation.

For RF media you pay* once and that’s it. Sometimes the payment is $0. Sometimes it’s crediting the creator. Sometimes you have to pay a one-time fee. Many RF stock sites contain images that fit into multiple categories. Whenever on a stock website, always check that you have set your filters to only show you free content if that is what you are looking for.

I’ve compiled a list of sites that provide royalty-free (RF) images, video, and/or audio below.

I’ve also included some creative commons (CC) sites. Those are special licenses that allow you to use the media for free, but there are sometimes limitations on how you can use the media, and how to credit the author. See more on creative commons and the various types of licenses here. Or you can check out the Comm Labs resources on Creative Commons here.

General Stock Sites

These sites have images along with video, and sometimes audio

Openverse Creative Commons Search

Adobe Stock (Note: there do not appear to be free audio files, only images and video) Not all stock on the site is free, but there’s a good selection that is. Just make sure to check the ‘free’ box in the filters when searching. If it asks you for payment when you click license, then you know you need to search again.

PixaBay is free to use without attribution in most cases. Check their license for more.

Canva also has plenty of free images you can use, along with some video, animations, and their templates. Items with crowns next to them are only available with paid accounts. Note: you get more stuff for free if you sign up with your Simmons email address, since education accounts get access to many (but not all) premium features.

DepositPhotos focuses on imagery, but also has some free videos and music. Just be aware that not all works on the site are free, much like Adobe stock. So make sure to stick to the free filter. All their free content requires attribution.

Audio

BenSound has a section of the site with music that is free with attribution

Purple Planet music is free with attribution in most cases. Check out their license page for more info.

Free Sound is good for sound effects and the like

Zap Sounds free sound effects 

Images

Unsplash is my go-to. RF with attribution, so make sure to credit the person who made your media!

Burst from Shopify has good stock images. The collection is geared towards supporting its main business as a platform for independent e-commerce shops, so the stock does tend to reflect that.

Jopwell has a selection of stock photography available focusing on BIPOC in business and education settings. It’s fairly specific, but useful when you need corporate imagery.

WOC in Tech Flickr page similarly focuses on a narrow remit but does it well. Note that not all images on Flickr are RF or CC, but images by/on this particular page are. (If using Flickr, always check the copyright status of the individual image you are interested in using)

Gratisography has funky imagery that is off-beat

KaboomPics is good for lifestyle and interior design shoots

StockSnap.io has images that are licensed as CC0, meaning free of all copyright restrictions.  

iStock. Be VERY careful about which images you are selecting. iStock is owned by Getty images—one of the largest and most prestigious photo libraries in the world. They want to funnel you to their paid site, but there is a lot of microstock that is free, if you make sure to search carefully.

Pexels. Note: some photos are free. Others and videos are RF (for a fee)
How to Use Font Explorer X Pro

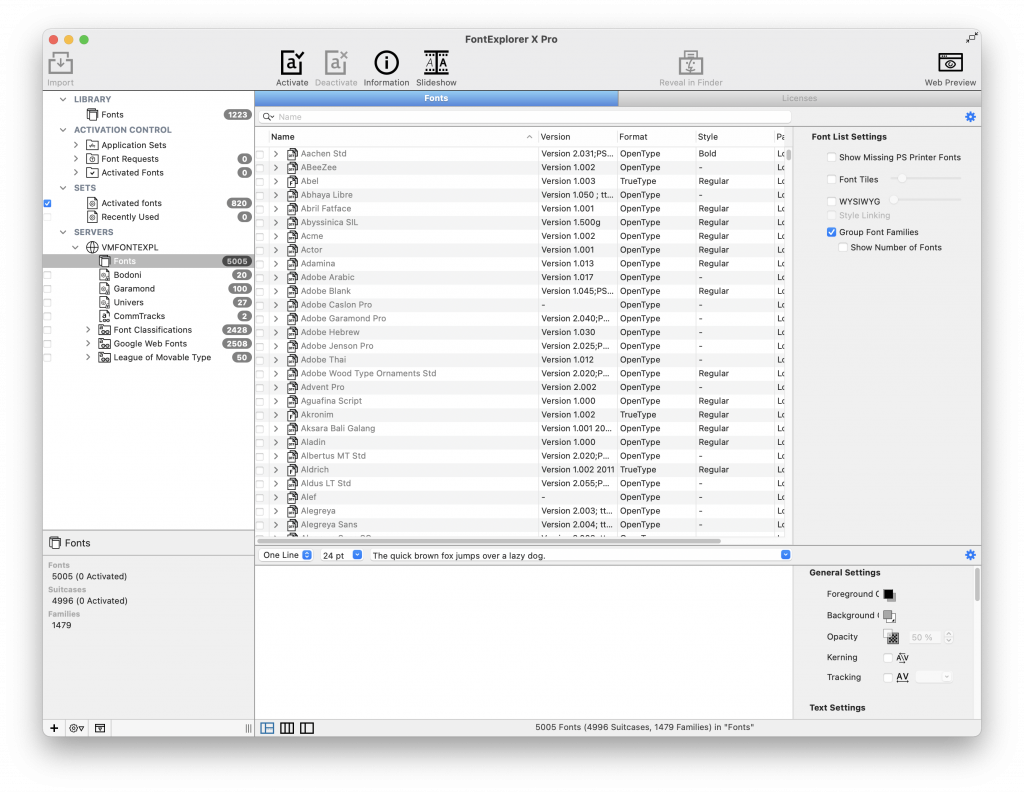
FontExplorer X Pro is a software for finding and managing fonts, available on all lab computers. It works similarly to Adobe Fonts in that you can find and activate new fonts from a server.

Activating fonts from the server

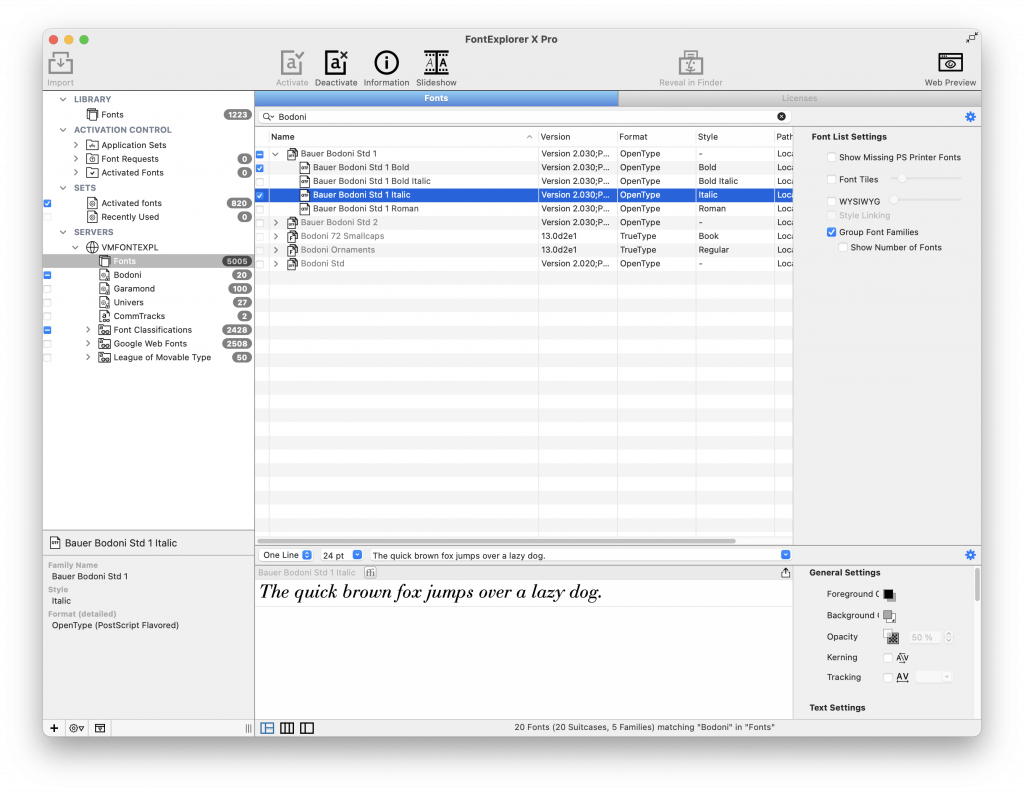
To add a font from the FontExplorer server, click on the SERVERS dropdown menu, select VMFONTEXPL, then Fonts. This will show a list of all the fonts available on the server.

If you want to activate a specific font, start typing its name into the search bar. When you see the font you want, click on the checkbox next to its name to activate it. You can activate select styles from the font (e.g. italic, bold) by clicking the dropdown arrow next to the font’s name. Click on a style to preview it.

Adding downloaded fonts

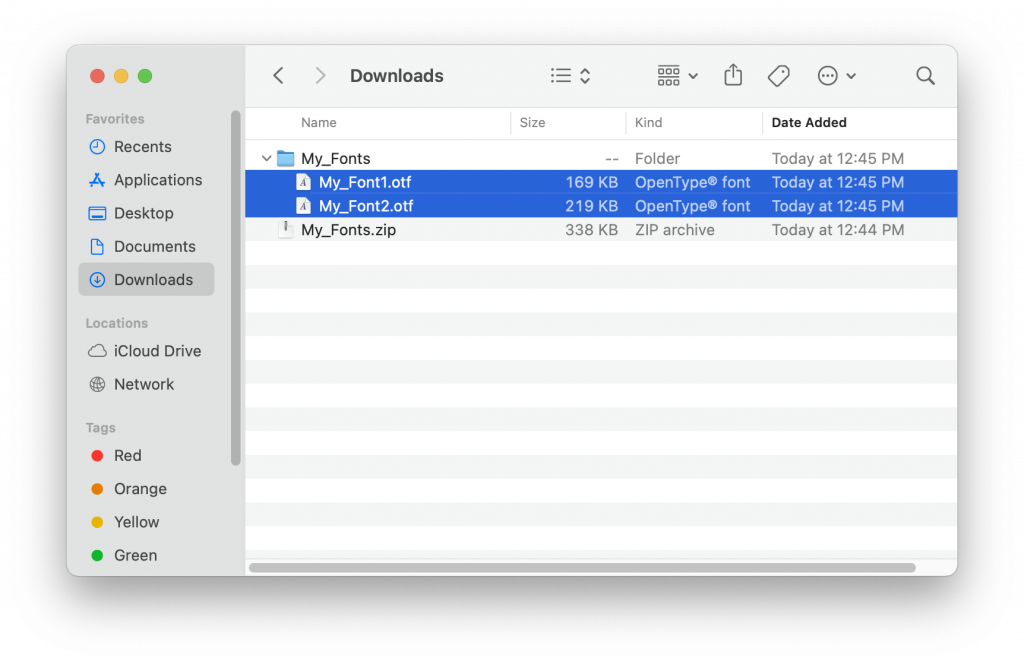
You can also add fonts that you downloaded from other sources. Unzip the file that you downloaded and open the folder. There should be a list of font files inside.

Select all of the ones you want to add to FontExplorer, then drag them onto the FontExplorer window until a green plus sign appears. This will add the fonts to Font Explorer so you can access them from InDesign or other software.

Troubleshooting

FontExplorer must be open and running in order for you to access your fonts. Don’t quit FontExplorer until you are ready to log off.

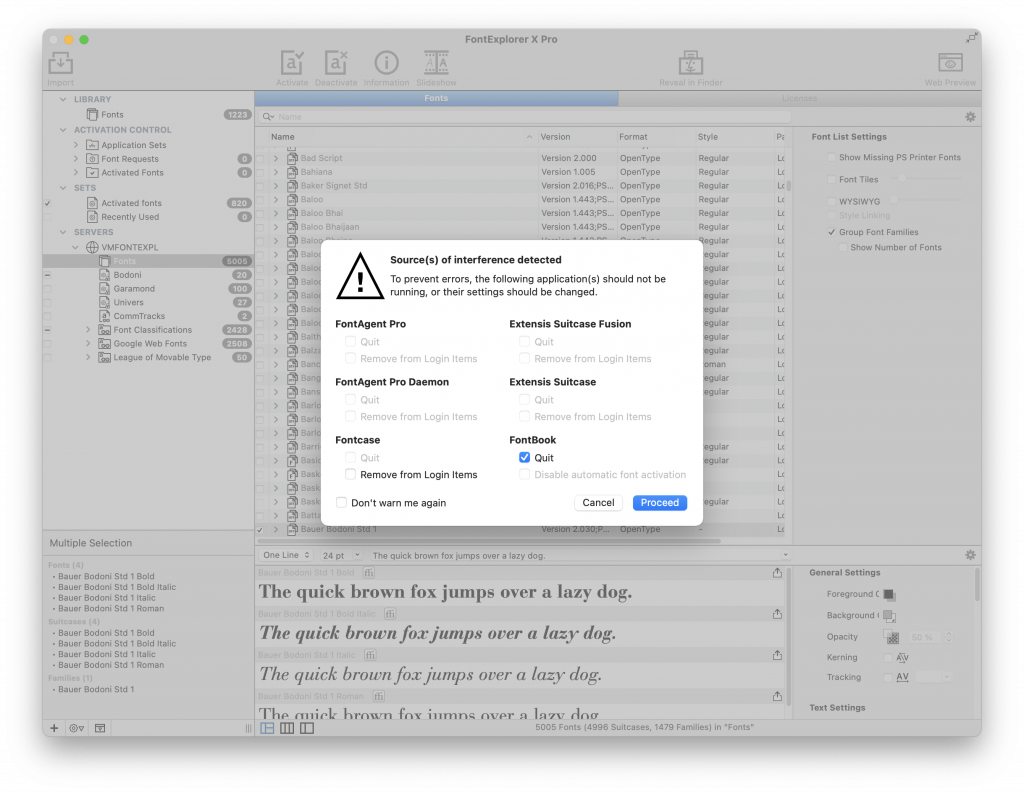
If you accidentally open another font management software, such as FontBook, it will conflict with FontExplorer and you will get this message. Click Proceed to quit FontBook and continue using your FontExplorer fonts.

Placing an InDesign Document in InDesign

Let’s say you have created an awesome poster in InDesign and you want to feature it in your design journal. What are your options? You could save a picture of the poster as a PDF or JPEG and place that in your design journal document…or you could place the original InDesign file!

What are the advantages of this? Well, to start, any edits you make to your poster later are easily synced with the document you placed it in. You also don’t have to worry about what resolution or colors your JPEG file uses, because those will be retained from your InDesign document. So let’s get started!

Selecting a file

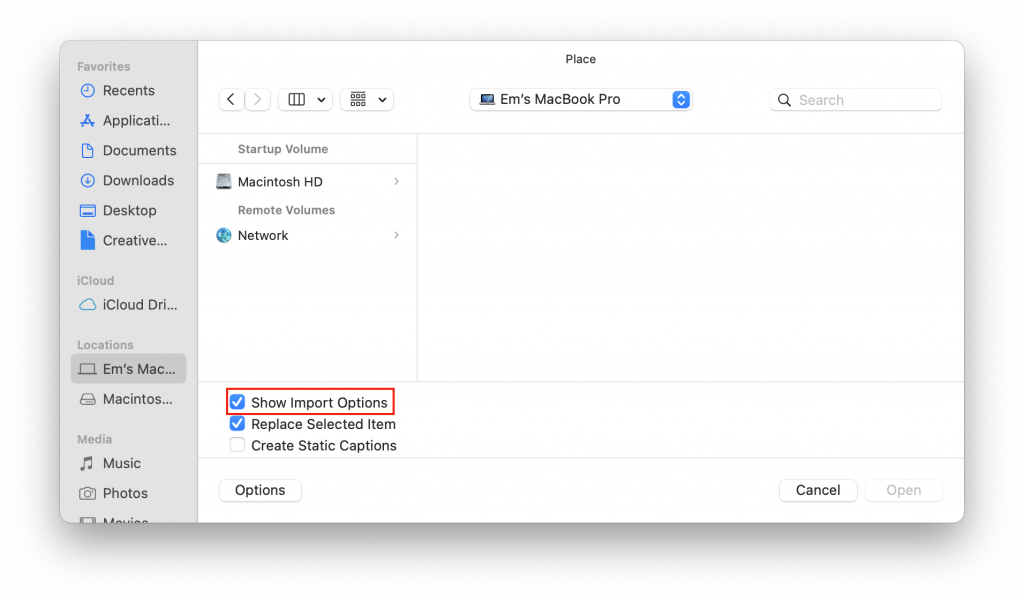
Just like placing any other object in your InDesign document, start by going to File > Place. Navigate to the file you want to use. Before you open it, click the Options button and check the box labeled Show Import Options. Then click Open. If you don’t check this box, InDesign will place the first page of your document by default.

Selecting pages

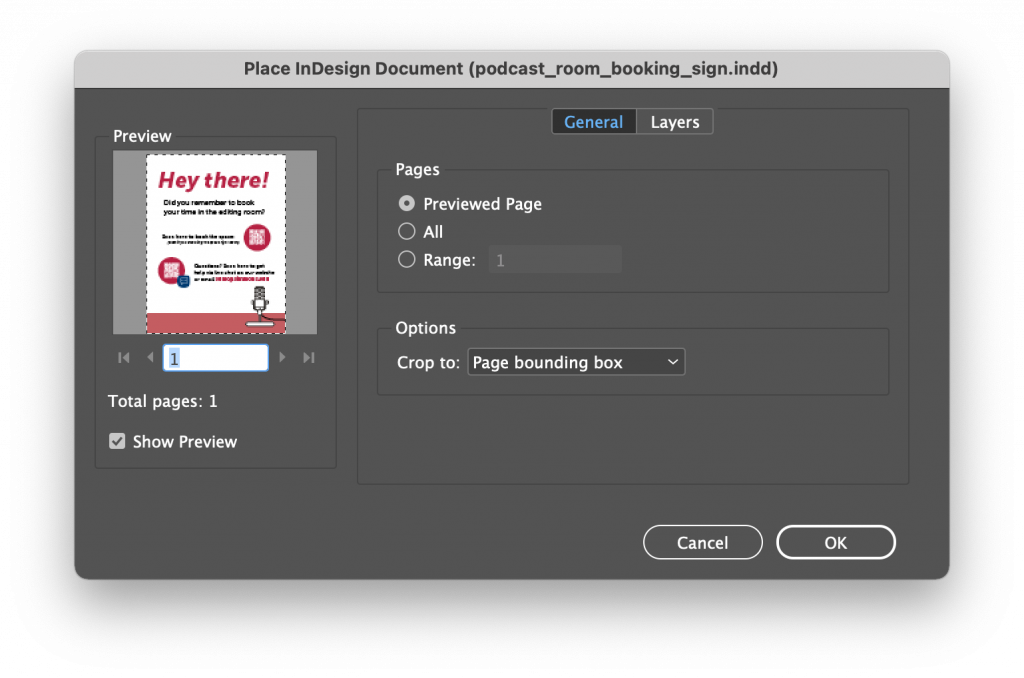
By default, InDesign will place the first page of the document. If you want to place a different page, or more than one page, you can do so in this dialog box:

  • Previewed Page places the page you see in the preview panel. You can changed the previewed page by clicking on the arrow buttons on the bottom.
  • All Pages places each page in the document, one after the other.
  • Page Range allows you to select a single page by its page number, or a range of pages. Entering 2 will give you page 2, entering 3-5 will give you pages 3, 4, and 5, and entering 3, 5 will give you pages 3 and 5.

Placing pages

Once you have selected the pages you want to place, click OK. The first page you selected is now attached to your cursor. Click and drag to draw a frame and the page will automatically be placed inside (clicking once places the page at full size). If you selected more than one page, your cursor will have the next page ready to go on your next click. If you selected too many pages, you can press Esc to cancel.

Changing the page

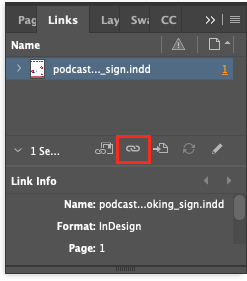
If you want to change which page you place, select its frame and open the Links panel (Window > Links). Click the chain icon to Relink. This will let you select the file again and change the pages that you import. You can also relink the file in the Properties panel (Window > Properties) by clicking the Import File button under Quick Actions.

How to share your design space in XD

Overview:

  • Sharing types
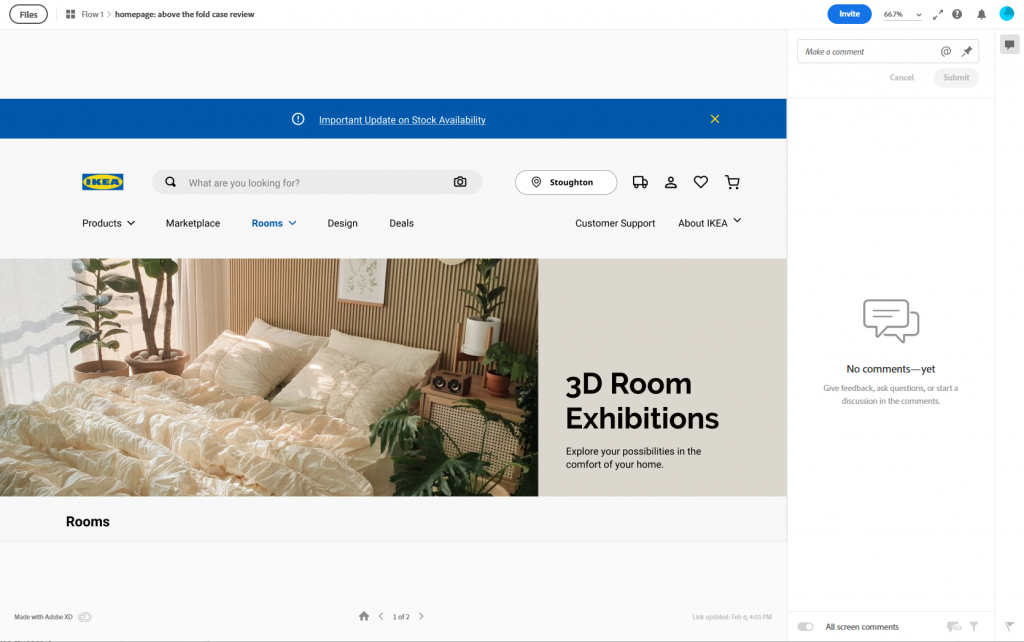
  • What does a design review look like?

In this document, we’ll go over two share types:

  • Sharing the entire design file
  • Sharing a selection of artboards

Sharing your entire design file

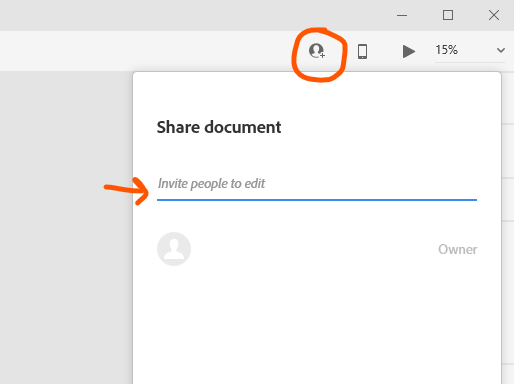
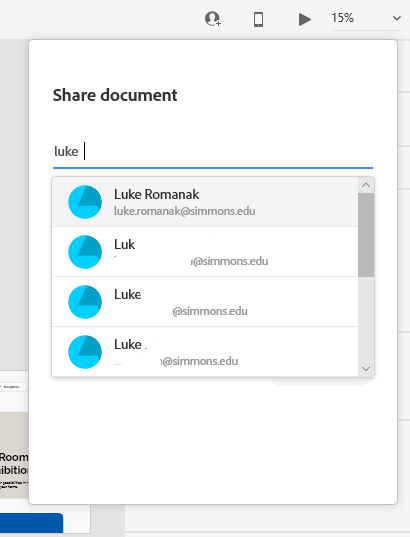
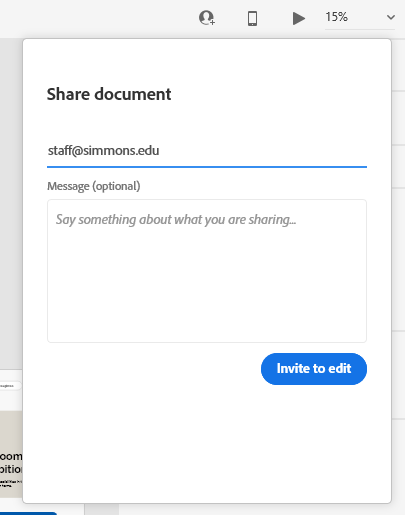
Invite faculty and staff to access your design file by entering their name or email address. Be sure to use your student login in order to successfully find people by name.

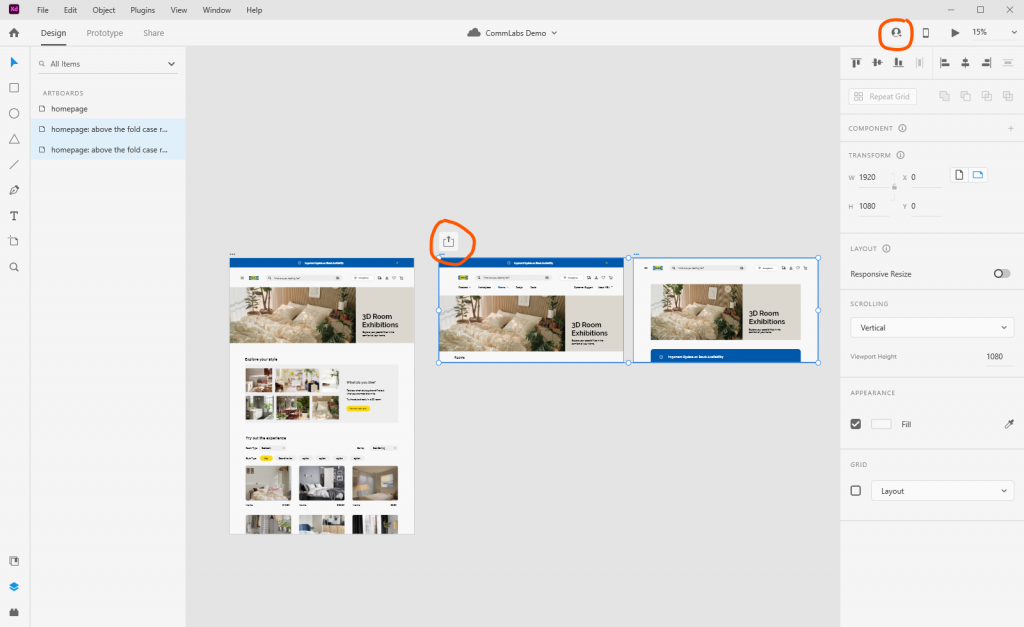
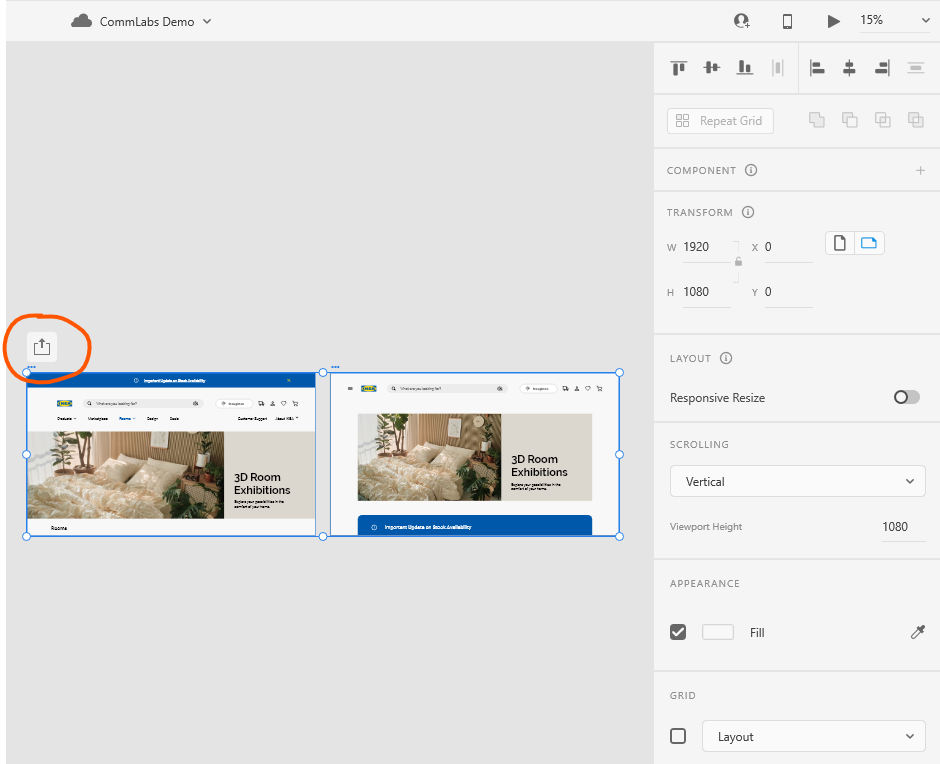
Click on the icon to show the “Share document” popup
Option 1. Find the Simmons faculty, staff, or student you want to give edit access to
Option 2. Type their email

Sharing a selection of artboards

Share select artboards so they can access only these designs for comment and review.

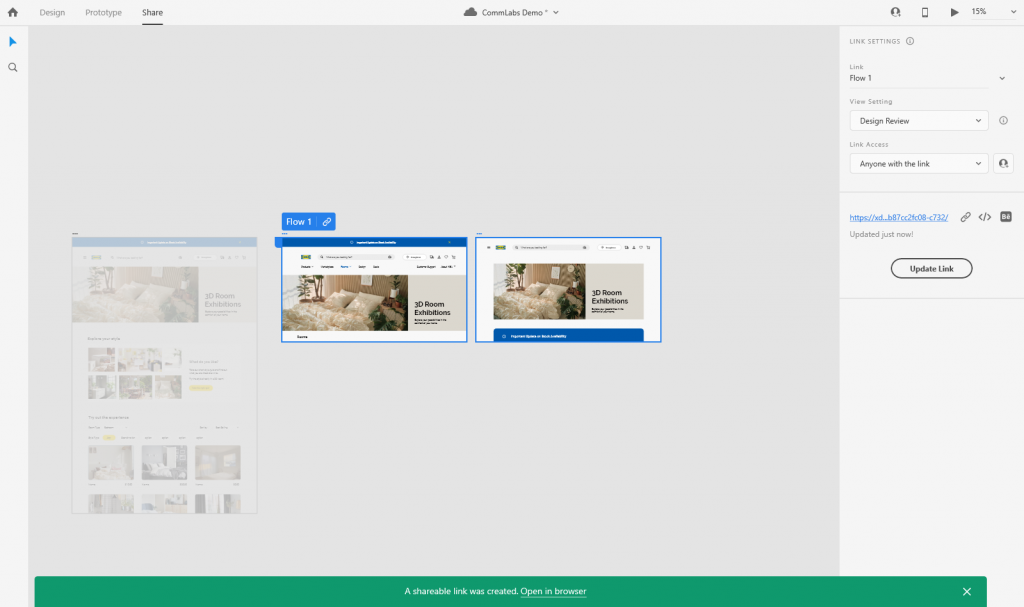
You’re now directed to the Share mode where you can name your link, set its intention (design review, user testing, send to the development team, or presentation). Note: If you update your designs after creating the link, you must update the link.

What the Design Review webpage looks like

Additional Resources:

Share selected artboards | Adobe XD

Share designs and collaborate with your team. | Adobe XD

Exporting XD Elements in Batches

Overview:

  • Select assets and artboards for export
  • Mark artboards for batch export

Select assets and artboards for export

macOS

Select an object or an artboard, navigate to File > Export or press Cmd + E.    

Windows

Select an object or an artboard and navigate to File > Export.  

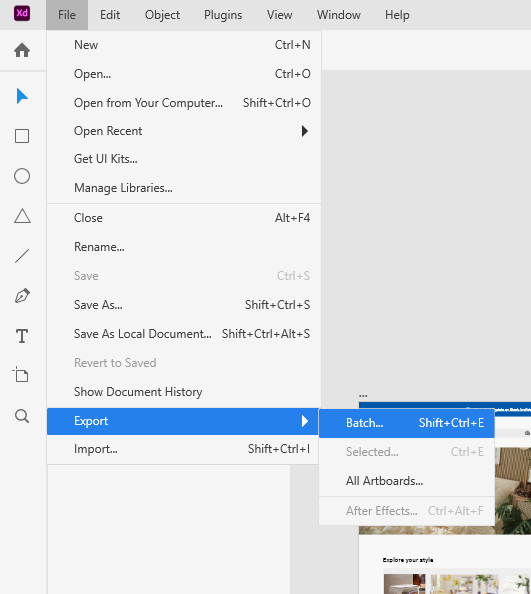
  • Batch: You can batch export assets that are marked using Mark for Export option in the Property Inspector. To export multiple objects as a single asset, group the objects before export.
  • Selected: You can select and export specific assets.
  • All artboards: You can select all the artboards for export in a design project.
  • After Effects: You can select the asset to export to After Effects.

Mark artboards for batch export

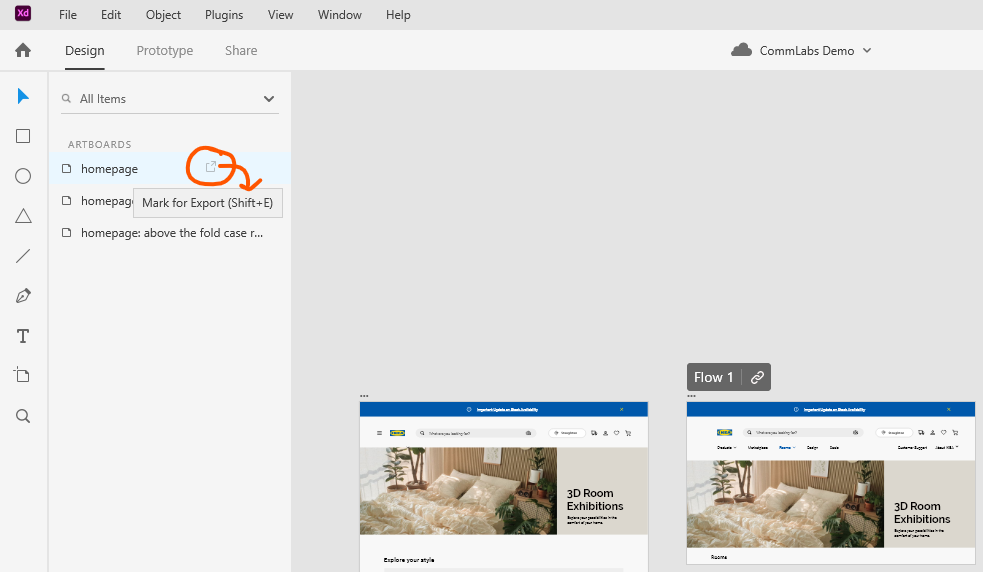
Go to your Layers panel (hotkeys: CTRL + Y) to view your list of artboards

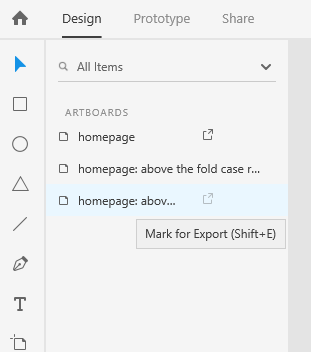
Hover over an artboard to show the Mark for Export symbol or use the keys Shift + E. Click on the button.
Repeat for all the artboards you want to export.
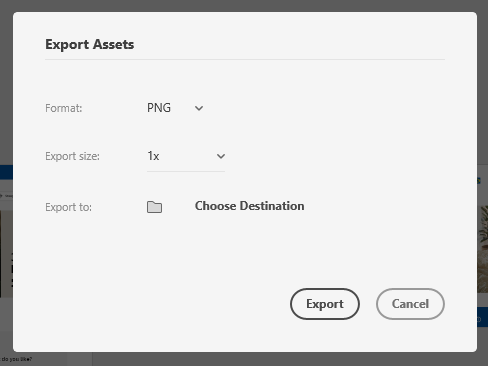
Go to File > Export > Batch
Select your export options

Additional Resources:

Export design assets | Adobe XD

How to Change Images to Black and White in Photoshop

Printing a color image in black and white can make it look washed out or flat on paper. Instead, use these methods to make your image black and white in Photoshop and have more control over how the final image looks!

Method #1: Use a Black and White Adjustment Layer

This method is non-destructive, meaning the layer simply covers the colors instead of removing them from the image permanently.

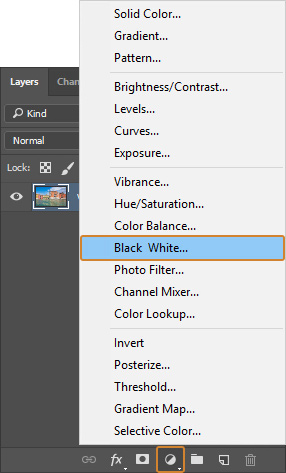
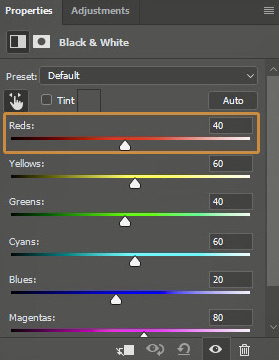
  1. Make a black and white adjustment layer. From the Layers Panel, click on the New Adjustment Layer icon (half black/white circle) and select Black & White.
2. Adjust the color sliders. In the Properties Panel, there are six sliders: Reds, Yellows, Greens, Cyans, Blues, and Magentas. These sliders control the brightness of the greyscale version of each color. For example, moving the Reds slider to the right will lighten the pixels that were originally red. This can be used to create contrast and depth in the image.

Method #2: Convert Image with the Camera Raw Filter

This method is destructive, meaning that the image will be permanently changed to black and white once applied.

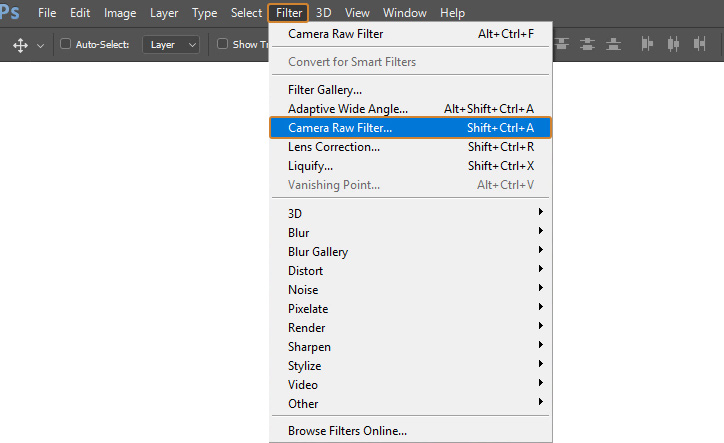
  1. Apply the Camera Raw Filter. Go into Filter and select Camera Raw Filter.

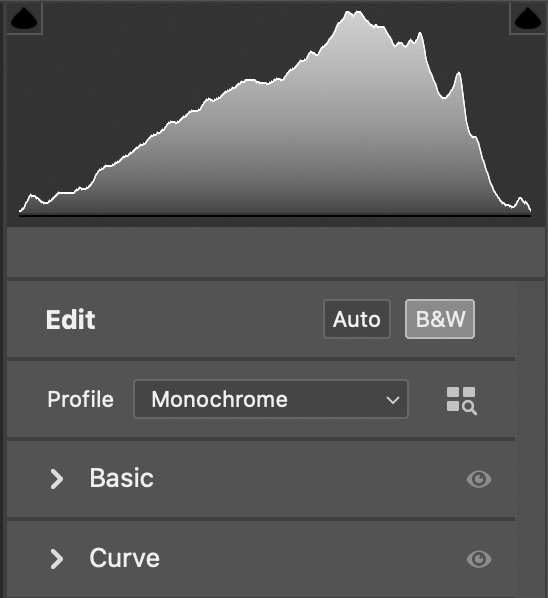
2. Convert image to black and white. Either click on the B&W button or select Monochrome from the Profile drop-down menu.

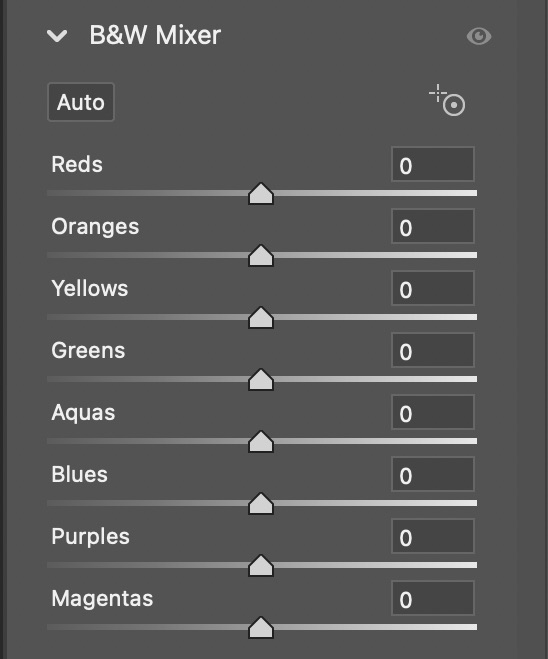
3. Adjust the color sliders. Under B&W Mixer, there are eight sliders: Reds, Oranges, Yellows, Greens, Aquas, Blues, Purples, and Magentas. These sliders control the brightness of the greyscale version of each color. For example, moving the Reds slider to the right will lighten the pixels that were originally red. Because of the two additional sliders, you have more control over the image compared to using a black and white layer.

How to Print From InDesign

InDesign gives you many options to control how your document prints, so you will need to pay attention to settings such as printer selection, paper size and feed, color profile, and page selection to make sure you get the results you want.

The Print Dialog

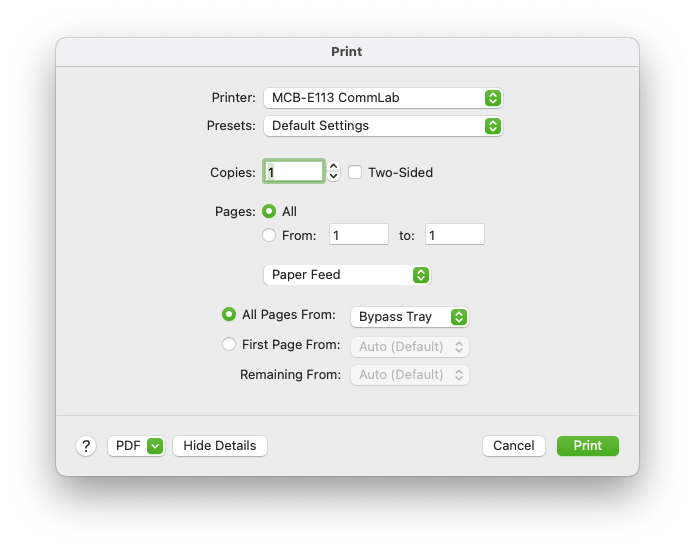
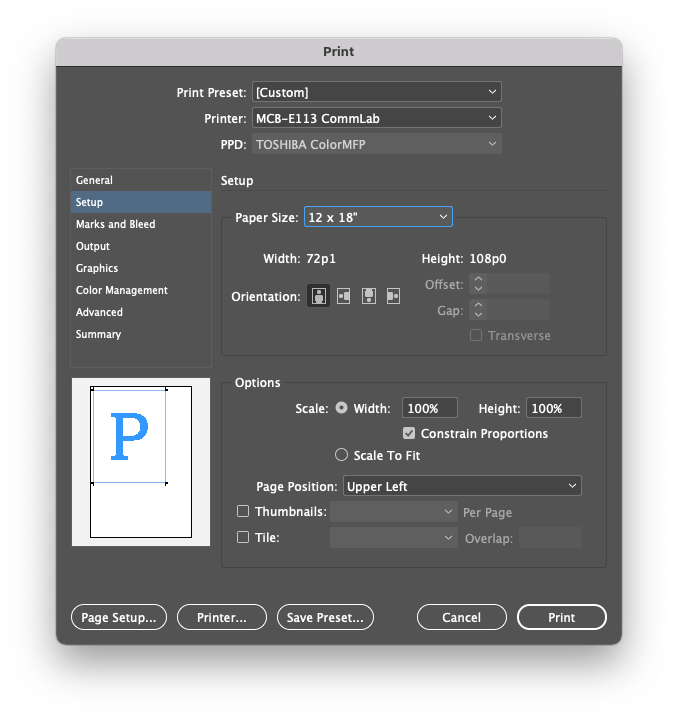
Open the print dialog box by going to File > Print. This is the main dialog for printing in InDesign and contains the following options:

  • Printer: Determines what printer the document will go to.
  • Page Range: Selects which pages will be printed. You can enter a range (e.g. 1-3), a list (e.g. 1, 2, 3), or a combination of the two (e.g. 1-3, 5).
  • Sequence: Determines whether pages will be printed individually (Pages) or as part of a spread (Spreads)
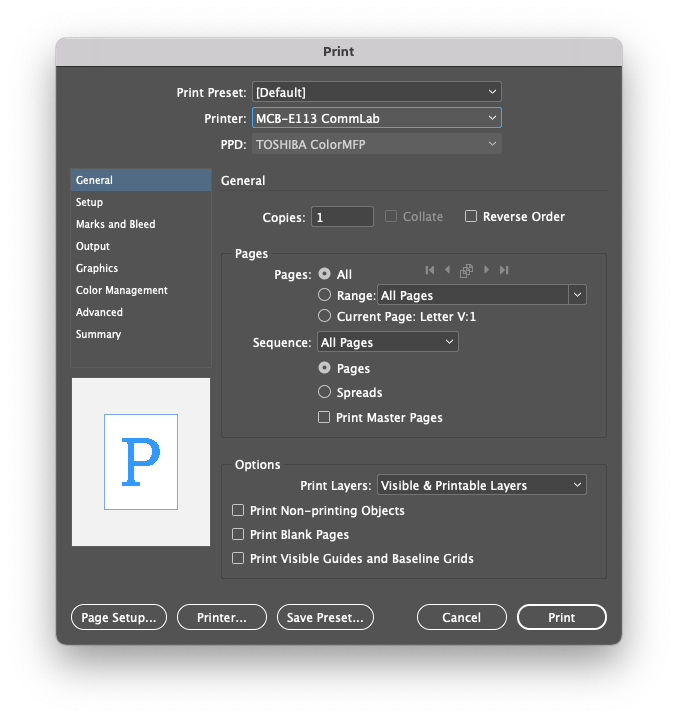
  • Printer…: Opens the printer settings dialog, which lets you select paper feed.

Printer Settings

The printer settings dialog lets you choose which paper tray the document will print from. If you are using the Epson printer in the lab, select Bypass Tray to load your own paper.

Setup

The Setup tab in the main print dialog lets you choose the paper size, position of the document on the page, and any tiling options you want.

  • Paper Size: Selects a paper size from a list of presets.
  • Page Position: Positions the document on the sheet with left/right align and centering.
  • Tile: Allows a large document to be printed over multiple smaller sheets of paper.

Marks and Bleed

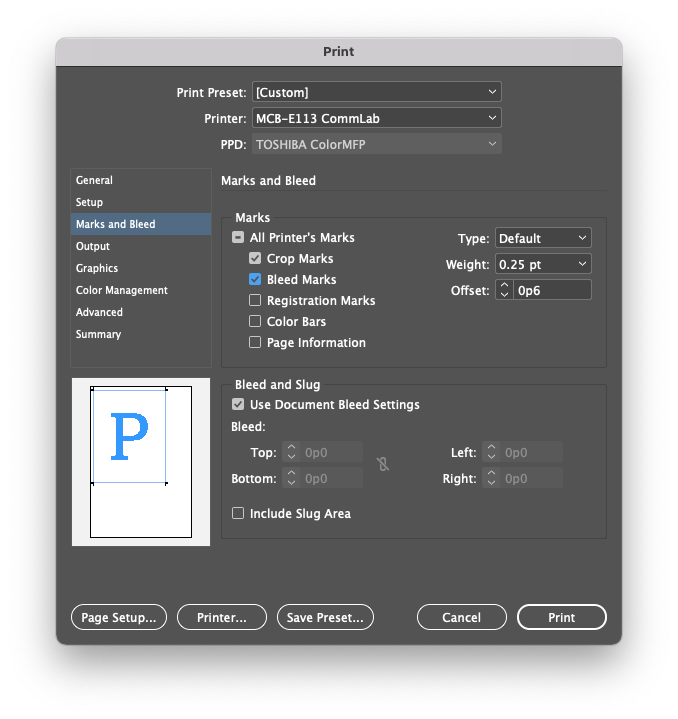
This tab in the main print dialog allows you to print extra information or guide marks on your document.

  • Crop Marks: Prints lines on the outside of your document to show where to trim it. You can change the distance using the Offset.
  • Bleed Marks: Shows where the edge of the document bleed is.

Using the Dry Mount Press

The dry mount press in the CommLab is an easy way to neatly mount your artwork on matte board without messy tape, drippy glue, or curling paper. Just follow these steps to create perfectly mounted artwork.

Tools and Materials

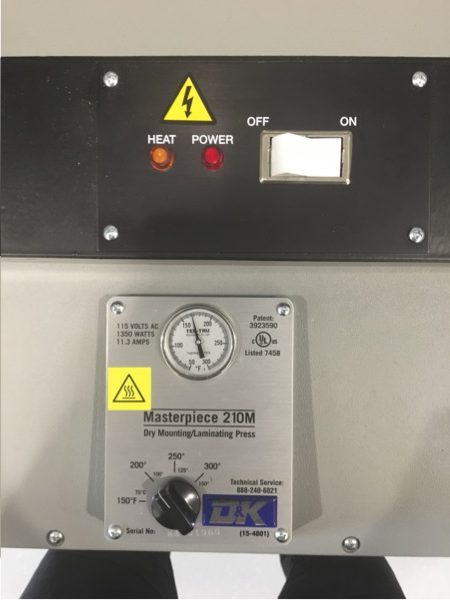
Dry mount press: Before you begin, make sure the press is turned on, as it takes 20 minutes to heat up. The on switch is located on the top next to the indicator lights. The temperature for permanent adhesion is 200F.

Release paper pocket: You will need a release paper pocket to prevent your project from sticking to the inside of the dry mount press. These are located in the drawer underneath the dry mount press.

Dry mount tissue: Ask the Lab Agent for the right size dry mount tissue for your artwork. The CommLab has pre-cut tissue sheets in a number of sizes, but we can cut custom sizes too.

Steps

  1. Open your release paper pocket and place your artwork inside face down. Lay the dry mount tissue over top, making sure to cover the entire artwork, as any paper left uncovered will not stick to the matte board. Close the release paper pocket, taking care not to move the layers around. Use the tacking iron to tack down a corner of the dry mount tissue to keep it from moving around when you place it inside the dry mount press.
  2. Place the release paper pocket inside the dry mount. Close the lid, pushing firmly to make sure it is down all the way. Leave the pocket in the dry mount press for about 35 seconds, then remove the pocket and let it cool for 20-30 seconds.
  3. Trim the excess tissue from the edges of your artwork – once you mount the artwork, you will not be able to remove it. Then, place your matte board inside the release paper pocket. Line up your artwork on top of the matte board with the tissue side facing down, then carefully close the release paper pocket. Use the tacking iron to tack down a corner of the artwork so the layers do not move around. Then, place the entire folder back into the dry mount press, and set the timer on top for 2 minutes. When it’s done, remove the pocket and place the metal weights on top while it cools, about 5 minutes.